Linux Intermediate Part3

whoami: It shows the current username.
labex:project/ $ whoami
labex
id: Linus users are organize into groups. To see which group you are belong to we can use id command.
labex:project/ $ id
uid=5000(labex) gid=5000(labex) groups=5000(labex),27(sudo),121(ssl-cert),5002(public)

## root is the superuser and it's like the administrator of the system.
labex:project/ $ id root
uid=0(root) gid=0(root) groups=0(root)
uid: Your User ID (a unique numerical identifier).gid: Your primary Group ID.groups: All the groups you are a member of.
labex:project/ $ sudo apt update
Get:1 http://mirrors.cloud.aliyuncs.com/ubuntu jammy InRelease [270 kB]
Get:2 http://mirrors.cloud.aliyuncs.com/ubuntu jammy-updates InRelease [128 kB]
Get:3 http://mirrors.cloud.aliyuncs.com/ubuntu jammy-backports InRelease [127 kB]

## installing htop
labex:project/ $ sudo apt install htop
Reading package lists... Done
Building dependency tree... Done
Reading state information... Done
sudo: Stands for "SuperUser DO." It allows you to execute commands with administrator privileges (temporarily).apt: The tool for installing and managing software.install: Tellsaptthat we want to install a program.htop: The specific program we want to install. (**htop is like the dashboard which gives real time view of what is happening inside the system)
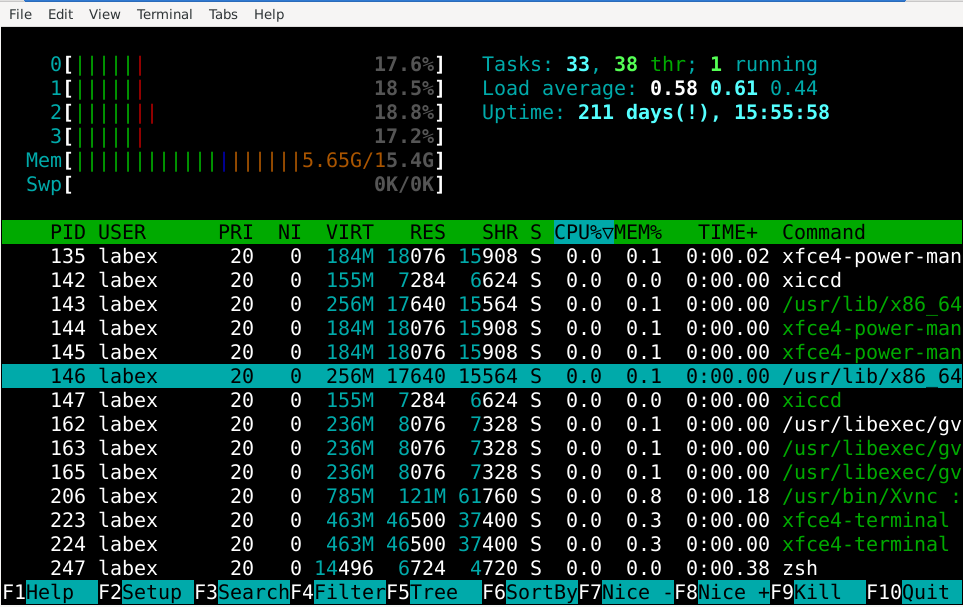
htop: Once it is run, it will give the output like the below. q is to quit
touch: This is for creating a new empty file and update the timestamp of existing file. See the below examples.
labex:project/ $ touch example.txt
labex:project/ $ ls
example.txt
Let’s read about the file information about permission and all.
labex:project/ $ ls -l example.txt
-rw-rw-r-- 1 labex labex 0 Oct  6 02:52 example.txt
-rw-rw-r--represents the file permissions (we'll explore this more in Step 4). The first character indicates the file type (-for a regular file,dfor directory, etc.). The remaining characters represent read, write, and execute permissions for the owner, group, and others.The first
labexis the current owner of the file. This is the username that owns the file.The second
labexis the current group of the file. A group is a collection of users that can share permissions.0is the file size in bytes. Since the file is empty, its size is zero.Jul 29 15:11is the last modified date and time.example.txtis the file name.
chown: This command allows us to change both user and group ownership of a file. See the below example and explanation.
labex:project/ $ ls -l example.txt
-rw-rw-r-- 1 labex labex 0 Oct  6 02:52 example.txt
labex:project/ $ sudo chown root:root example.txt
labex:project/ $ ls -l example.txt
-rw-rw-r-- 1 root root 0 Oct  6 02:52 example.txt
sudoruns the command with root privileges. You'll likely be prompted for your password.chownrequires elevated privileges because it's a powerful command that can affect system security. Withoutsudo, you'll get a "Permission denied" error.chownis the command to change ownership.root:rootspecifies the new owner and group (both set to root). The syntax isowner:group.example.txtis the target file.
chown -R: This is to change the owndership and group ownership of a directory including the sub directory. See the below example.
labex:project/ $ cd new-dir
labex:new-dir/ $ ls
file1.txt  subdir
labex:new-dir/ $ cd ..
labex:project/ $ ls -lR new-dir
new-dir:
total 4
-rw-rw-r-- 1 labex labex 13 Oct  6 03:13 file1.txt
drwxrwxr-x 2 labex labex 23 Oct  6 03:14 subdir

new-dir/subdir:
total 4
-rw-rw-r-- 1 labex labex 13 Oct  6 03:14 file2.txt
labex:project/ $ sudo chown -R root:root new-dir
labex:project/ $ ls -lR new-dir
new-dir:
total 4
-rw-rw-r-- 1 root root 13 Oct  6 03:13 file1.txt
drwxrwxr-x 2 root root 23 Oct  6 03:14 subdir

new-dir/subdir:
total 4
-rw-rw-r-- 1 root root 13 Oct  6 03:14 file2.txt
chmod 700: This command is to change the permission of a file.
labex:project/ $ ls -l example.txt
-rw-rw-r-- 1 labex labex 0 Oct  6 03:20 example.txt
labex:project/ $ sudo chmod 700 example.txt
labex:project/ $ ls -l example.txt
-rwx------ 1 labex labex 0 Oct  6 03:20 example.txt
700is a numeric representation of permissions:The first digit (
7) represents the owner's permissions.The second digit (
0) represents the group's permissions.The third digit (
0) represents the others' permissions.
Each digit is a number from 0 to 7, calculated by adding the values for read (4), write (2), and execute (1) permissions:
4: Read permission2: Write permission1: Execute permission0: No permission
So, 7 (first digit) gives the owner read (4), write (2), and execute (1) permissions: 4+2+1=70 (second digit) gives the group no permissions (0+0+0=0).0 (third digit) gives others no permissions (0+0+0=0).
Therefore, 700 means: Owner: read, write, execute. Group: none. Others: none.
chomod -R: Changing the permission of a directory.
labex:project/ $ mkdir ~/test-dir
labex:project/ $ chmod 700 ~/test-dir
labex:project/ $ ls -ld ~/test-dir
drwx------ 2 labex labex 6 Oct  6 03:26 /home/labex/test-dir
labex:project/ $ chmod -R 755 ~/test-dir
labex:project/ $ ls -ld ~/test-dir
drwxr-xr-x 2 labex labex 6 Oct  6 03:26 /home/labex/test-dir
-Rapplies the change recursively to all files and subdirectories (though our directory is empty in this case). It's good practice to include it when dealing with directories, even if they're currently empty, in case you add files later.755gives read, write, and execute permissions to the owner, and read and execute permissions to group and others.
Let's break down 755:
Owner (7): Read (4) + Write (2) + Execute (1) = 7
Group (5): Read (4) + Execute (1) = 5
Others (5): Read (4) + Execute (1) = 5
labex:project/ $ echo '#!/bin/bash\necho "Hello, World"' > script.sh
labex:project/ $ ls -l script.sh
-rw-rw-r-- 1 labex labex 32 Oct  6 03:34 script.sh
labex:project/ $ ./script.sh
zsh: permission denied: ./script.sh
# The permission is denied becase the user/owner doesn't have the 'execute'(x) permission.

## Now the below command will give the user(owner) the execute permission.
labex:project/ $ chmod u+x script.sh
labex:project/ $ ls -l script.sh
-rwxrw-r-- 1 labex labex 32 Oct  6 03:34 script.sh
labex:project/ $ ./script.sh
Hello, World
It creates a new file named
script.sh. The.shextension is commonly used for shell scripts. shell scripts are executable files that contain a series of commands that are executed in sequence.It writes two lines into this file:
#!/bin/bash(called a shebang) tells the system this is a bash script. The shebang line specifies the interpreter that should be used to execute the script. In this case, it's/bin/bash, which is the path to the Bash interpreter.echo "Hello, World"is a command that will print "Hello, World" when the script runs. Theechocommand simply displays the text that follows it.\nis a newline character, ensuring the commands are on separate lines in the file.
urefers to the user (owner). Other options aregfor group,ofor others, andafor all (user, group, and others).+xadds execute permission. The+symbol adds a permission, while the-symbol removes a permission.
So, u+x means "add execute permission for the owner."
useradd: This is to create a new user.
sudois a command that gives you temporary superuser (administrator) privileges. We use it because creating a new user requires these higher-level permissions.useraddis the command to create a new user.jokeris the username we're creating.
Note: By using sudo, we can temporarily elevate our privilage to perform administrative task.
labex:project/ $ sudo useradd joker
labex:project/ $ sudo grep -w 'joker' /etc/passwd
joker:x:5001:5001::/home/joker:/bin/sh
Username: joker
Password: x (the actual password is stored securely elsewhere)
User ID: 5001
Group ID: 5001
Home Directory:
/home/joker, but it hasn't been created yetDefault Shell:
/bin/sh
useradd -m: This option tells the system to create a home directory for the user. A home directory is like a personal folder where user can store their files and settings. Below command shows user bob is created with home directory.
labex:project/ $ sudo useradd -m bob
labex:project/ $ sudo ls -ld /home/bob
drwxr-x--- 2 bob bob 57 Oct  8 03:08 /home/bob
dat the start means it's a directoryrwxr-x---shows who can read, write, or execute in this directoryThe two
bobentries show that both the user and group owner of this directory is bob57is the size of the directory in bytesJan 19 13:33is when the directory was created/home/bobis the location of the directory
passwd: This to set the password for the user. 1st it will ask for new password then retype it. It will not show while typing.
labex:project/ $ sudo passwd joker
New password:
Retype new password:
passwd: password updated successfully
Note: Linux store the encrypted passwords in a secured file called /etc/shadow. This is more secure than storing them in the /etc/password file where anyone can see them.
usermod: This is to modify the user account settings.
labex:project/ $ sudo usermod -d /home/wayne joker
labex:project/ $ sudo grep -w 'joker' /etc/passwd
joker:x:5001:5001::/home/wayne:/bin/sh

## we can change the user account default shell. See the below example.
labex:project/ $ sudo usermod -s /bin/bash joker
labex:project/ $ sudo grep -w 'joker' /etc/passwd
joker:x:5001:5001::/home/wayne:/bin/bash

## Adding user to the sudo group
Adding user to a group: In the below example we are adding the user joker to the sudo group. After the command is executed, the user doesn’t need to add sudo in his/her command for administrative task such as installing/removing software, change configuration file etc.
labex:project/ $ sudo usermod -s /bin/bash joker
labex:project/ $ sudo grep -w 'joker' /etc/passwd
joker:x:5001:5001::/home/wayne:/bin/bash

## verify that the user is added to the sudo group
labex:project/ $ groups joker
joker : joker sudo
usermodis the command to modify user accounts-aGmeans "append to Group" (add to a group without removing from other groups)sudois the group we're adding the user tojokeris the user we're modifying
## The below command is to lock the user account using passwd -l

joker@68e562760f92ec70f1309fa2:~$ sudo passwd -l joker
passwd: password expiry information changed.

## See the result
joker@68e562760f92ec70f1309fa2:~$ su - joker
Password:
su: Authentication failure

## passwd -u is to unlock the user account
joker@68e562760f92ec70f1309fa2:~$ sudo passwd -u joker
passwd: password expiry information changed.
joker@68e562760f92ec70f1309fa2:~$ su - joker
Password:
To run a command as administrator (user "root"), use "sudo <command>".
See "man sudo_root" for details.
Delete the user: To delete the user and its home directory we use userdel -r.
sudo userdel -r bob


